I would LOVE the opportunity to come teach your group! Please email for details.
LET THE MAGIC IN YOU COME OUT!

Search This Blog

2.05.2011

Caribbean Perfection!

I'm a beach lover. 


I've lived near beaches since I was 9 when my father was stationed at Keesler AFB in Biloxi, Mississippi. 


I took these pictures of Biloxi beach in October 2k9 when Jerry and I stopped to spend the night there on our way to Houston, TX. 

I was on the way to teach at 2009 International Quilt Festival!!!

Me!!!


I have so many great memories of Biloxi and since we were driving by...I decided to check out my old stomping grounds.

Now, I have even more great memories and I LOVE Biloxi more than ever.


This section of the Gulf of Mexico is a gorgeous spot and I WILL return.


If you're ever fortunate enough to visit Biloxi, I highly recommend the Palace as THE place to stay. 


When I was 12 we moved to Virginia where I got a taste (for 34 years) of Virginia Beach.


Totally makes me miss living there...


but my most beloved beaches are those of SW Florida  where Jerry and I would take our little boat and explore the barrier islands and coastline from Naples to Venice Beach and all points between.


Halcyon days indeed.


When I found out I was moving to Colombia...I was delighted to realize that Pedro's city, Barranquilla, is on the Caribbean to the north and bordered by the Magdalena River to the East. 


It took us eight months of living here  -
 
8 months!!!  

- to do it, but we finally got ourselves to the beach!


Of course we took Sophia who was absolutely delighted.


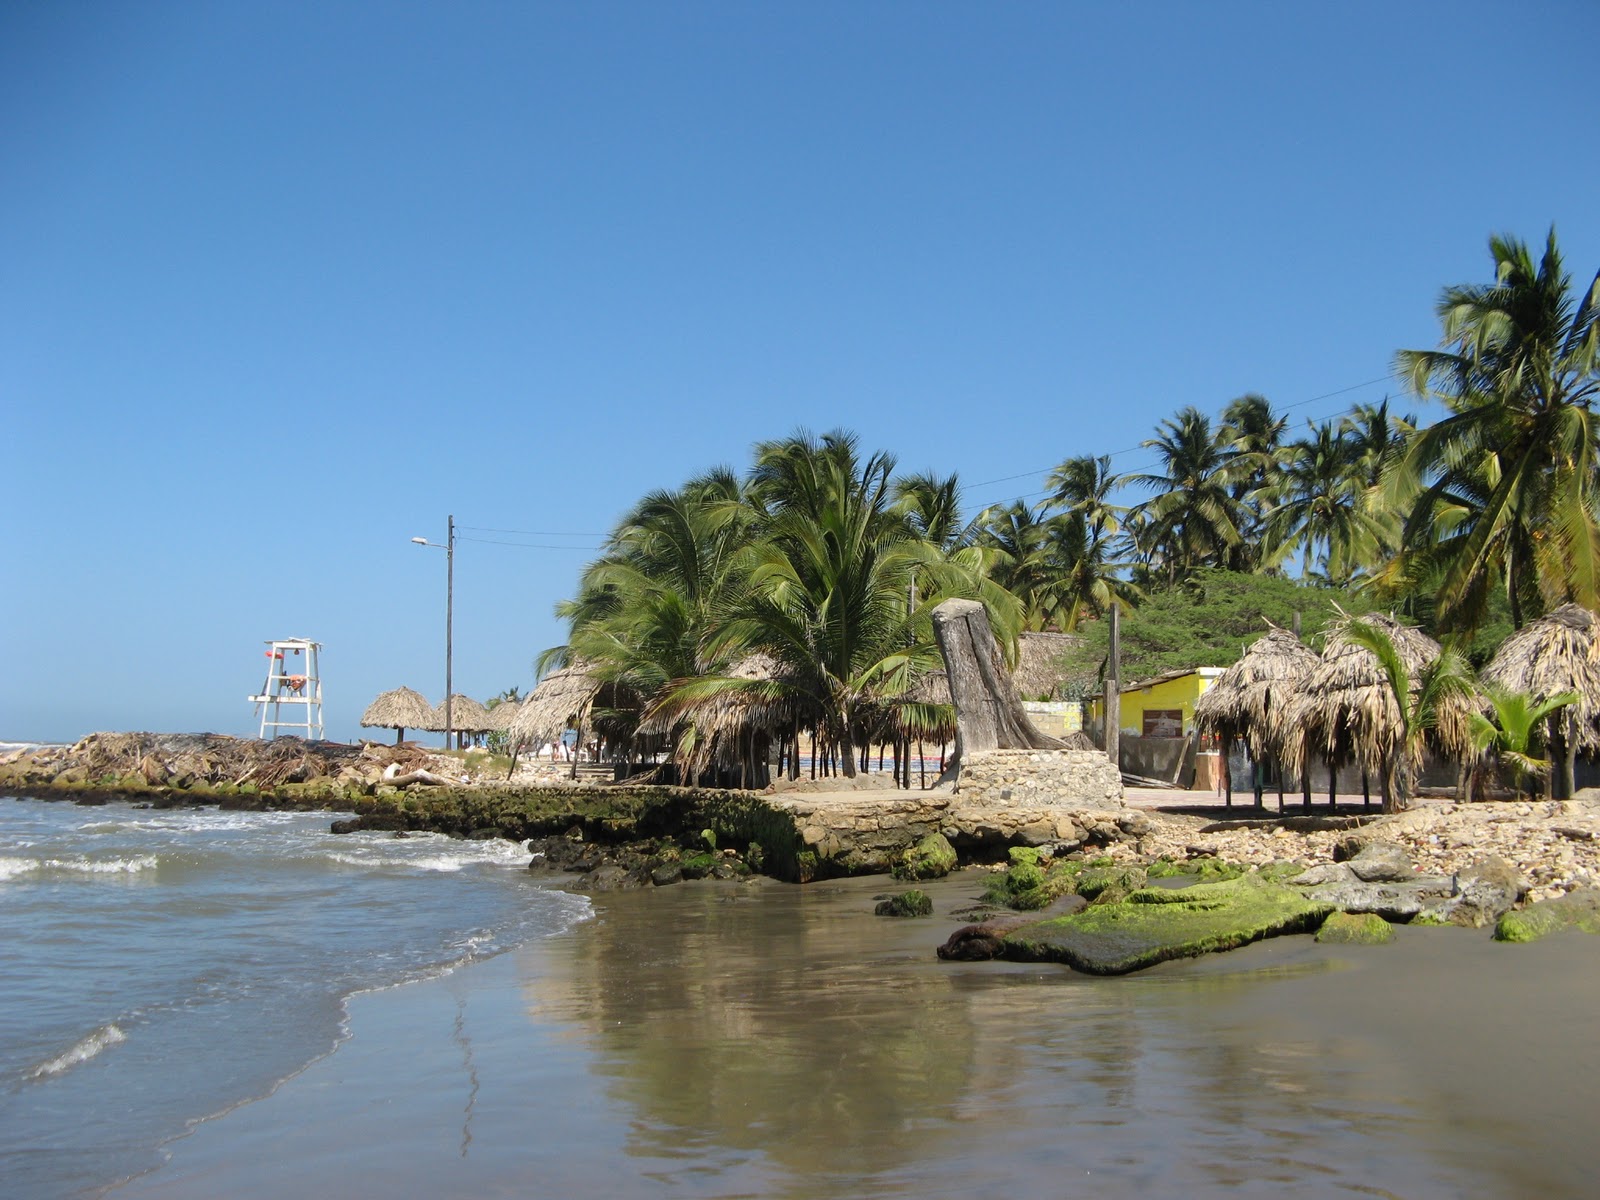
This particular stretch of sand is in Puerto Colombia - a small town - about 15 minutes down the coast from Barranquilla. I think you could call it a fishing village.


At any rate...it was spectacular!!!


Just ask my wascly wabbit...


The buildings you see in these pictures all offer a place to sit and eat a meal or have a drink while enjoying the beach...


The coastline is rocky in this section of the world...


And the muddy water from Rio Magdalena, just to the East, causes the dark sandy beach...


We sat at Hotel Prado Mar that day - just on the other side of that lifeguard stand - and had a marvelous lunch. 

It was so wonderfully gratifying that we went again this week and here are the pictures I took from the second trip...


Once again, I find myself in Paradise.


Create your life,


annie!


2.02.2011

What's Your Sign?!?

I didn't know why there was so much buzz recently about the Zodiac changing - 

because I don't follow my horoscope - 

and if it was on the news in the States, I missed it. 

You have to remember, I'm living in Barranquilla, Colombia and at any rate...I don't have much time for TV. 

Unless Modern Family is on. And then I'm so sleepy by 10pm I miss that half the time.

But...when I saw so much hype on Face Book about the Zodiac calendar changing because of the earth's rotation...


I checked to see what was going on. It seems that many of us now have new Zodiac Signs.

Imagine that!

Here's what comes up at the top of my google search:


For most of 56 years I thought I was a Taurus but it turns out...I'm now Aires. 

Here are descriptions of the two that I pulled offline...(is that a word?)


Aires...
the first sign of the zodiac, is the emergence of the sprouting seed. It is the pint of all beginnings. Aries is the out-rushing force --sound and fury-- primitive self-expression -- the joy of being. Its forcefulness is much like the ram which lowers its head and blindly charges. The Aries influence gives an adventurous, pioneering spirit, courage and a blunt and direct manner. The forcefulness of Aries is so strong that restrictions cannot be endured. Aries people are forever moving on to new projects, seldom completing the old ones. An Aries person inhibited by daily routine and a sedentary life is likely to eventually explode. The "me first" attitude of Aries can go to the extremes of selfishness, crudeness, egotistical attitudes and foolhardiness if it is not tempered by sensitivity to other and strong guiding ideals.


TAURUS
Taurus combines the practicality of earth with the concentrated nature of a fixed sign. Taurus people, being ruled by Venus, are lovers of beauty and are themselves often quite charming. They are very affectionate, but their strong need for security sometimes lets their affectionate nature become possessive. Taurus people are strongly rooted in their opinions. They can be stubborn and don't like to be contradicted. However, Taurus people can change. Just don't expect that to happen more than once! Tauruses are particularly patient and often reliable and practical if their laziness and inertia don't get the better of them. Tauruses have incredible endurance and they often have an excellent business sense. They carve luxury, art and good food.


I was kind of blown away with the descriptions because I think Aires fits me lots better than Taurus does. What do you think?

Speaking of Aires - there is an airline by that name that flies into Barranquilla with pretty decent rates and I'd LOVE some company down here. I don't know if you could stand the weather though. 

It's 79 right now with a strong balmy breeze and is expected to go to 89 tomorrow. It's ALWAYS summer here. 

Our lanai - 


is as finished as it's going to get for the time being and is just waiting for company to sit on it.

The fruit vendors all over town will keep you refreshed...

And we can go out for fast food at a gazillion different restaurants in our barrio alone.


Our barrio, by the way, is Los Nogales. Named after a black walnut tree I think. I'll have to dig in to that and let you know for sure later.

We can visit a neighborhood tienda 


and drink a beer while watching Junior win a soccer game. Might as well - because business practically stops when they're playing. 

Seriously.

We'd have to go afield to find the real thing...but Jerry has been making some pretty cool alligators out of welding rods and scrap metal...


Is he awesome or what?!? 

We can visit Salgar Castle


which is way over there on that promontory on the left side of this picture. I took this shot at my friend's house, who lives on the beach between here and Puerto Colombia.

Speaking of friends. I am now meeting with a small group of ladies who gather together every week to make quilts or do handwork.
For the last several years, whenever I snap a shot of anyone, anywhere, I always say...

OK Everybody...Say Shit.

And inevitably get some giggles. 

I can't help it. My dad did that all my life and it was the only time that I could say a cuss word without the threat of getting my mouth washed out with soap.

These girls speak Spanish when we meet. The lady in the back speaks pretty perfect English and has been my translator. The day that we were at the house above, when everyone burst out laughing, I, of course called on my 'interpreter' to find out what was being said.

She explained to me about this bus that runs from Barranquilla to Puerto Colombia - which didn't used to be - but now is - a tour bus. The bus is extremely long and I honestly didn't get the joke...but when it goes by the Barranquilleros say nojoda. Only...because the bus is long...they stretch out the word till it sounds like nojoooooooooooooooda. (no-hoe-da). They then explained that nojoda means holy shit and had me repeat it a few times. 

Seriously. 

We were having so much fun. 

:)

So...when it came time to leave and I was already outside snapping pictures, I took one of them.

And said...

OK Everybody

...say nojoooooooooooooda.

They thought that was hilarious!


I am very fortunate, grateful and happy to be a part of this elegant, refined group of women with their big, loving hearts.

We met at my house last week and I had a gallon zip lock baggie full of small scraps. I asked and they agreed to participate in a challenge where we divided the scraps into six piles and we each have to make something...anything...out of them. The only rule we came up with was that only 1/4 of the finished product could be of something they added to the scraps.

I decided to make a necklace out of my scraps and I'm about half way through with it now. I'm lovin it and will show you pictures another day.

For now...I'll leave off. Got to go work on that necklace!

Create your life,

annie!

1.30.2011

OK - Here It Is...The Really Truly Completed... 'Let There Be Peace On Earth And Let It Begin With Me'.

I honestly thought I was finished with this book the last time I posted to my blog...but this time, I really am done...binding included.


Those arrows btw, are pointing outward for a reason.


And that's all I'm going to say...psychospiritually speaking.


(Jeez...I thought I made up that word but when I  checked just now...it's already been made up. The cool thing is...it fits).

Anywho...several of you have asked me about techniques and at the risk of being really wordy - What's New?!? - I'm describing each page. 


Above is the front cover of Let There Be Peace On Earth And Let It Begin With Me. It took me 5-6 hours just to make the tabs that I used for binding!!! But I loved every minute of it. :) They're made entirely of scraps - a few from friends. (People are always offering them to me - IF I don't dig them out of the trash first!). The beads are of course also made from my scraps...including the snips of thread that I save.

I took these pictures before adding the grommets for binding so the arrow tabs look a little weird. I stressed about that for at least 37 seconds.


This is the first page of the book...chosen mainly because the title is included in the letter beads. I used discharged fabrics along with the Peace, Love & Mickey Mouse that I cut off an old t-shirt. The peace sign is from a sweatshirt that I'd decorated for my daughter, Hillary, but re-vamped it with paint and beads. 


The picture above is the flip side of the cover so anything I did to the cover that shows through to the back (on all the pages) has to be part of the design. I think that's the most challenging part for me.

It began as the silk lining of a kimono I bought and added paint and ink to. I then attached all kinds of ephemera - including the peace sign cut from a beer can and the rising sun made from melted grocery bags with threads sandwiched inside. The dingle berries on the side remind me of a friend who died before I could give them to her. (She'd bought a purse from me with some on it and asked for extra if I had them). Makes me miss her.


This is the cover of a notebook my friend, Davida, gave me when I visited the States last time. It's a hologram and switches to a peace sign with the word peace below it. The buttons and beads are wired on and have buttons/beads on the flip side of the page.


I attached the polka dot tissue paper to the back side of it.  I had the embossed circles from a previous project and then added this and that around the edges. The skinny tabs - again - are made with itty bitty scraps. The bead border and the button border were wired on and the flip side is also beaded / buttoned.


This piece was done with soy wax batik to which I added the shisha mirrors (bought in Colombia on my first trip down). I 'connected the dots' with marker and added that really cool yarn - that I've had forever - around the edges.


This is my favorite page but no matter how I tried, I couldn't get it to fit in with the correct orientation. I had wanted the 'binding' tabs to be on the other side. Oh well. The shiny piece in the middle is a technique from Beryl's book...Mixed Media Explorations - done on wallpaper. You can read more about the technique in an earlier blog, if you don't have the book. The borders were discharged with bleach and then I added free motion words and a tag from the silk blouse used on this page and throughout the book. The sequin trim is vintage.


This started out as the other side of shiny black card stock (which I'll talk about next) to which I glued some old aluminum foil which had lost it's shine. I added the letters cut from solvy lace and strips of leftovers from another paper project then stamped over them. The thread was disintegrating so I stuck the letters down with packing tape and outlined with marker The butterflies on the red satin at the bottom were rubbed on over a stencil with shiva sticks. The butterfly was a patch that I think I've had forever and I stuck on the yellow lace at the border...just because.


This started with a shiny black piece of card stock to which I'd experimented with to see if I could use it for my business card - so my info is printed on it in black...upside down. The peace signs were cut from a weaving I'd done awhile back that was just butt ugly. The triangles were left over from Christmas cards I'd made last year (last year?!?) (it was just 2 months ago) and the daisies were punched out of white card stock and then I added paint. I stamped a little over all. The red at the bottom is the back side of a piece that I used oil sticks on. The little daisies at the bottom were pre-cut from a store and the butterfly was the back of the stitching from the flip side - which I filled in with marker. The pink and white on the side was white fabric that I'd painted and stamped.


This is a cross discharged on an old velvet curtain that I bought at a yard sale. I echo stitched around it and sewed a piece of an old blouse at the bottom - to which I added paint and beads. The blue vintage lace is much more beautiful up close and personal. The peace rock was attached with clear thread.The rhinestones on the cross are iron on.
 

This page was done with soy wax batik (minus the green part which is painted) and again...the stitching is from the front side of the page. I added dots and stamps and words and hearts and charms and the picture of John Lennon which is an artist's business card and was painted by Tiffany Beasi. Her beautiful website is at http://www.tiffanybeasi.com/main/. I've emailed her today to see if this is breaking a copyright law and to know whether or not I need to remove the picture.


Here the top of a groovy vintage box that probably used to hold...who knows what?!? (It's bigger than a card box). I worked on the flip side first and you'll see that I used skewers to do some weaving and they ended up sticking every which way out of this side of it. (From the cross on the other side). I glued beads onto the sharp points and then got out my bag of scrap trims and did some weaving -lots more than you can see - on the skewers, but didn't like the result so I took pieces of sheer fabric that I'd done different surface design techniques to and ironed them down on top of it all. Because of the skewers...the sheers only touch the box in certain areas - which by the way - is that part in the middle with the pink, orange and white daisies with the green leaves. The flip side of the 2009 Houston International Quilt Show fabric scraps are at the bottom. I added the slightest bit of paint. This'll make more sense in a minute.
 

The red is the back side of the top of the heavy, vintage gift box above. (I painted it red because the inside was plain ugly). I added the cross which I'd cut out of a pin weaving I'd done a year or two ago. I thought I'd carry the weaving a little further so used shishkabob skewers to hold the cross down. Yes...it's all symbolic. Then I put the little card - which came from a Catholic church) down in the corner and the page from a calendar at the top. Of course I painted it. Then stamped and added the flower trim. I still didn't like it and while looking for something to add, I came across the piece of broken lace which I painted yellow. When I laid it down it reminded me of an angel. Cool huh?!? I still didn't love the page until I added the black and white fabric at the bottom. These were scraps I'd saved from my class when I taught at 2009 International Quilt Festival and I thank the lady who tossed these pieces in my scrap bag...whoever you are!
 
This is a cross discharged on a piece of velvet curtain...yep, that same piece...which didn't turn out too well. I wonder-undered sheer, stamped fabric to it and did some free motion stitching. The purple thing at the top used to be the part -of one of my favorite pair of shoes - the part that went across my foot to hold the shoe on. The bottom is a piece of fabric that I'd dyed previously and then played around with embroidery stitches. The sheer at the bottom holds my little mirror tiles inside. Oh yes...that pin in the middle of the cross is an exquisite vintage piece that I totally love and can remove to wear if i ever want to.


Dorothy, my friend, gave me some wool which I used as the background here at the top. I then took some of that crinkly, colorful stuff they use to pad/package gifts - something like tinsel but hairy-er - and free motion stitched it down. I stamped on top of that when I had extra paint to use up. (I NEVER throw paint down the sink...not even the tiniest bit). The cross was stitched on the other side so I alternately ironed on little gold squares and sewed beads to make the stitching look better /show up more. The Hamsa was one that I made from a piece of felt and used as a closure on the little black purse. Inside the purse is a piece of my friend's, Vicky, old satin pajama top free motion stitched with the words..."I am the one that the world has been waiting for". Because I am...and so are you. It IS up to us to bring peace to the world. The Salaam is beaded lettering. The bottom section was my 'try out this combination of thread before I do any actual sewing or make sure the machine is sewing properly now" piece. I added more gold letters which I tried to tone down with alcohol ink and marker dots. 


I painted one of those large white shiny envelopes (not tyvek) and added words cut from various materials. (For instance, the word 'and' was the inside of a coffee bag). I slathered it all down with gel medium and put plastic wrap over it to contain the sticky. The red border is the front facing from a dress which I free motion stitched flowers onto to complement the little white border at the bottom. The button used to be the one at the bottom of the dress and was already attached. The white border was from an article of clothing that my friend, Trish, gave me and I added scraps and thread to make a little flower garden. That little garden lights me up every time I see it. I don't throw ANYTHING away and it was made with what most consider trash.


From what I remember, on this side of the plastic feeling envelope - I painted and then hit it with the heat gun just to see what would happen. Nothing spectacular. It's the thinnest page in this book. I gel mediumed (is that a word?) the words to the painted envelope and again, covered it with plastic wrap so the sticky would be contained. The words were cut from old Christmas Cards I'd received from people I love. The blue trim just seemed to fit on top of the red facing from an old dress. The flower garden on the bottom is the back side of the flip. I added a touch of blue paint at the bottom.


I really got into my discharged fabric stash on this project. On the top, I'd lain a metal peace sign down before spritzing with bleach. I sewed a broken chain along the seam to hang some of my heart charms and added the look-alike scrabble letters. I was short a C so I used the real thing there. The little clear squares around the edge are the pieces I took the letters off of and then added a magic marker dot to.


This page began with a piece of one of my mother-in-laws pieced quilts. Don't freak...it was damaged in part or I never would've cut it up. You can see the squares if you look. I didn't love this section of it so I added a sheer fabric that I'd previously stamped. Then I stamped a little more. The stitching is from the flip side of the last pix. I used iron on rhinestones and beads that I'm made previously with a couple of dear friends - Carol and Jeri. The chipboard letters were from a box I'd bought at Joann's to which I added blue paint and glitter outline.


This is a red bag which I applied layers of glue (including silver sparkle glue) to and then hit with my heat gun. I live in mega humidity here in Barranquilla so it was still sticky but I covered it with copper pearl-x powder and it took care of the problem. I used a heavy thread in the bobbin which is why the swirly-q's show up so well along the side. The copper strips are stained glass artist tape. When I cut out the shapes  from the altered brown paper bag on the flip side (next), I glued them randomly to the red side, added stitching and a little yellow paint. I use cheap acrylic paint because I don't usually care about the hand of the fabric - which in this case...is paper anyway.


I use brown paper bags to protect my table when I'm painting sometimes (& to try out stuff on) and this is a piece of one. I accordion folded it and cut out the shapes - snowflake style, then glued it to the red paper bag and used gel medium over all. The strip on the side border is a piece of a that same gray silk blouse that I discharged and then added lots of stitching. The bottom silk is from the same blouse but I spray painted it. The skinny tabs are scraps sewn together.


This is a piece of black fabric which I discharged with bleach and then sewed some of my collection of crosses to. The copper tape around the border is something I bought at a yard sale and was intended for stained glass artists.


WAAAY back in the mid 90s, I joined Peninsula Piecemakers Quilt Guild in Hampton, Virginia. 

I was scared to death of quilting because it was such an unknown to me and my elementary art teachers were always telling me..."NO...that's not the way you do that"...so I was convinced I didn't couldn't wouldn't do art. Of course they were saying that about simple coloring or drawing. 

Back then, several women in the guild were working on color-wash quilts (I think they were called) and I came home and made my version of one - which is the part you see in the center of the page above. It was only about 6x9 inches and I never did anything with it until recently when I added borders of discharge dyed fabrics and did the grid quilting...which knocked the whole thing out of whack. I then used stick on letters to spell out Prince of Peace - which were too gold - so I marked them up. I ironed gold dots to each corner inside the borders and added the tabs which bind the book. This project began with this page, but ended up being the back cover.

Thank you so, so, very much for taking the time to look at, ask about and send the comments that you've been shooting my way. Not only about art but my life here in Colombia. I really appreciate you.

Peace brother,

Create your life,

annie!